Kipoi: Model zoo for genomics

![]()


![]()
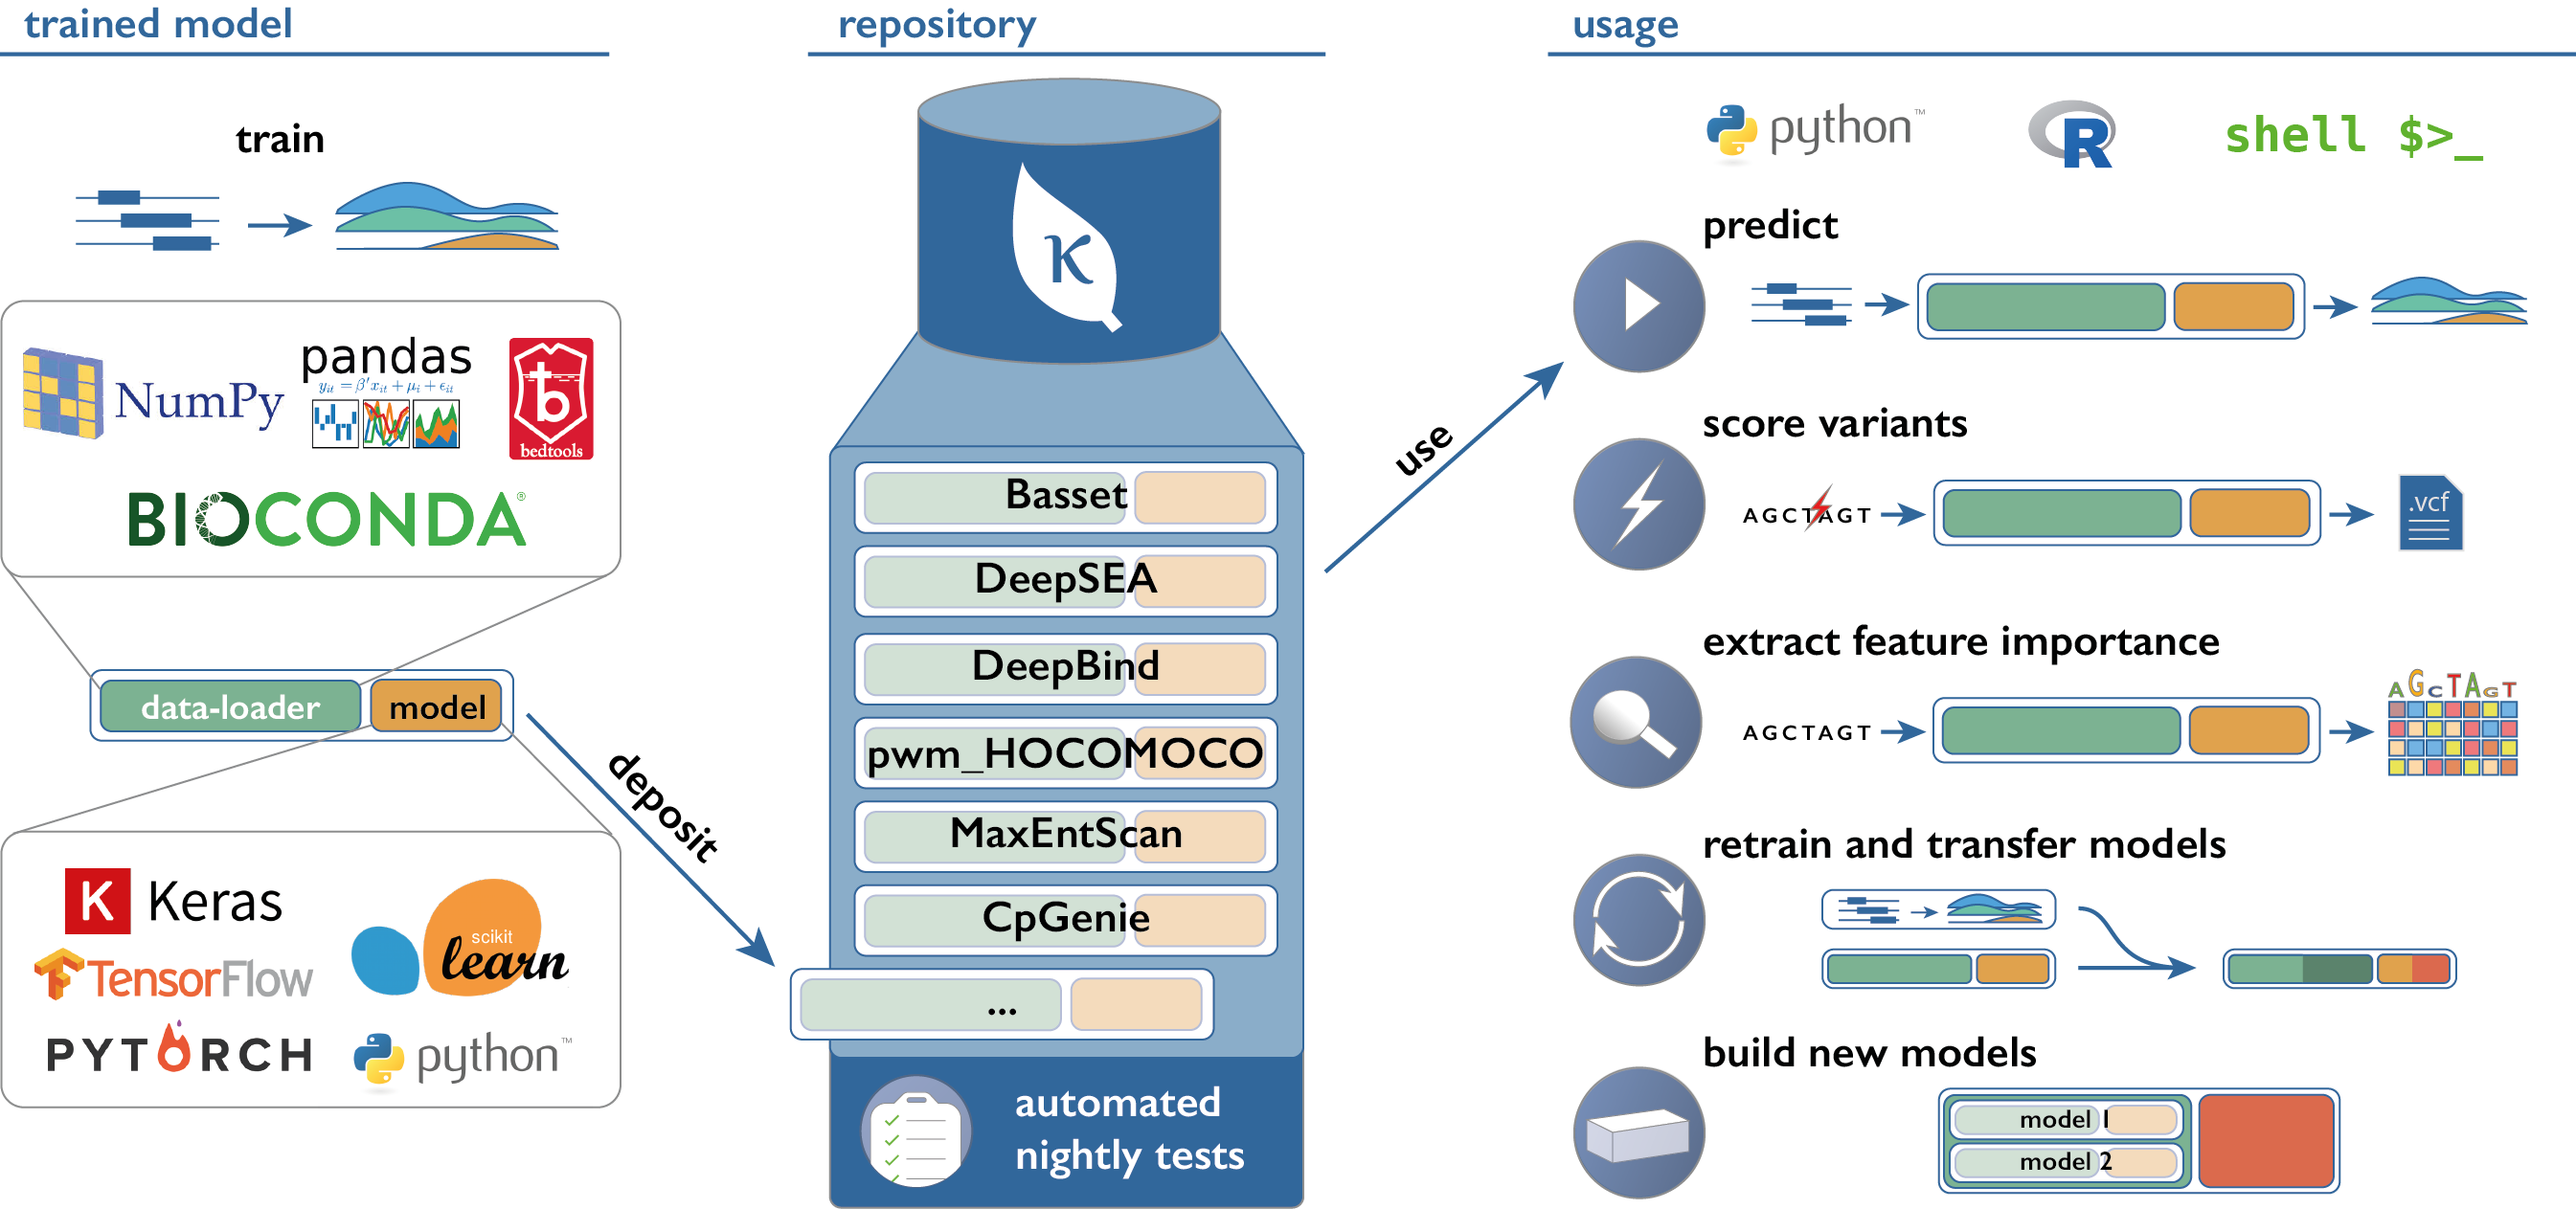
This repository implements a python package and a command-line interface (CLI) to access and use models from Kipoi-compatible model zoo's.
Links
- kipoi.org - Main website
- kipoi.org/docs - Documentation
- github.com/kipoi/models - Model zoo for genomics maintained by the Kipoi team
- biorxiv preprint - Kipoi: accelerating the community exchange and reuse of predictive models for genomics
- blog post introducing Kipoi, blog post describing 0.6 release
- github.com/kipoi/examples - Use-case oriented tutorials
Installation
Kipoi requires conda to manage model dependencies. Make sure you have either anaconda (download page) or miniconda (download page) installed. If you are using OSX, see Installing python on OSX. Maintained python versions: >=3.6<=3.10.
Install Kipoi using pip:
pip install kipoi
Known issue: h5py
For systems using python 3.6 and 3.7, pretrained kipoi models of type kipoi.model.KerasModel and kipoi.model.TensorflowModel which were saved with h5py <3. are incompatible with h5py >= 3.. Please downgrade h5py after installing kipoi
pip install h5py==2.10.0
This is not a problem with systems using python >=3.8<=3.10. More information available here
For systems using python >=3.8<=3.10, it is necessary to install hdf5 and pkgconfig prior to installing kipoi.
conda install --yes -c conda-forge hdf5 pkgconfig
Quick start
Explore available models on https://kipoi.org/groups/. Use-case oriented tutorials are available at https://github.com/kipoi/examples.
Installing all required model dependencies
Use kipoi env create <model> to create a new conda environment for the model. You can use the following two commands to create common environments suitable for multiple models.
kipoi env create shared/envs/kipoi-py3-keras2-tf1
kipoi env create shared/envs/kipoi-py3-keras2-tf2
kipoi env create shared/envs/kipoi-py3-keras1.2
Before using a model in any way, activate the right conda enviroment:
source activate $(kipoi env get <model>)
Using pre-made containers
Alternatively, you can use the Singularity or Docker containers with all dependencies installed. Singularity containers can be seamlessly used with the CLI by adding the --singularity flag to kipoi predict commands. For example: Look at the sigularity tab under this. Alternatively, you can use the docker containers directly. For more information: Look at the docker tab under any model web page on kipoi.org such as this. We are currently offering two types of docker images. A full sized version (under the banner Get the full sized docker image) comes with conda pre-installed along with model (group) specific dependencies. Use this if you plan to experiment with conda funcitonalities. A slim sized version (under the banner Get the docker image) comes with all dependencies installed. However, it does not come with a working conda packge manager. Use the slim versions if you plan to use it for kipoi related tasks only.
A note about installing singularity
Singularity has been renamed to Apptainer. However, it is also possible to use SingularityCE from Sylabs. Current versions of kipoi containers are compatible with the latest version of Apptainer (1.0.2) and SingularityCE 3.9. Install Apptainer from here or SingularityCE from here.
Python
Before using a model from python in any way, activate the right conda enviroment:
source activate $(kipoi env get <model>)
import kipoi

kipoi.list_models() # list available models

model = kipoi.get_model("Basset") # load the model

model = kipoi.get_model(  # load the model from a past commit
    "https://github.com/kipoi/models/tree/<commit>/<model>",
    source='github-permalink'
)

# main attributes
model.model # wrapped model (say keras.models.Model)
model.default_dataloader # dataloader
model.info # description, authors, paper link, ...

# main methods
model.predict_on_batch(x) # implemented by all the models regardless of the framework
model.pipeline.predict(dict(fasta_file="hg19.fa",
                            intervals_file="intervals.bed"))
# runs: raw files -[dataloader]-> numpy arrays -[model]-> predictions
For more information see: notebooks/python-api.ipynb and docs/using/python
Command-line
$ kipoi
usage: kipoi <command> [-h] ...

    # Kipoi model-zoo command line tool. Available sub-commands:
    # - using models:
    ls               List all the available models
    list_plugins     List all the available plugins
    info             Print dataloader keyword argument info
    get-example      Download example files
    predict          Run the model prediction
    pull             Download the directory associated with the model
    preproc          Run the dataloader and save the results to an hdf5 array
    env              Tools for managing Kipoi conda environments

    # - contributing models:
    init             Initialize a new Kipoi model
    test             Runs a set of unit-tests for the model
    test-source      Runs a set of unit-tests for many/all models in a source

    # - plugin commands:
    interpret        Model interpretation using feature importance scores like ISM, grad*input or DeepLIFT
# Run model predictions and save the results
# sequentially into an HDF5 file
kipoi predict <Model> --dataloader_args='{
  "intervals_file": "intervals.bed",
  "fasta_file": "hg38.fa"}' \
  --singularity \
  -o '<Model>.preds.h5'
Explore the CLI usage by running kipoi <command> -h. Also, see docs/using/cli/ for more information.
Configure Kipoi in .kipoi/config.yaml
You can add your own (private) model sources. See docs/using/03_Model_sources/.
Contributing models
See docs/contributing getting started and docs/tutorials/contributing/models for more information.
Plugins
Kipoi supports plug-ins which are published as additional python packages. Currently available plug-in is:
kipoi_interpret
Model interpretation plugin for Kipoi. Allows to use feature importance scores like in-silico mutagenesis (ISM), saliency maps or DeepLift with a wide range of Kipoi models. example notebook
pip install kipoi_interpret
Variant effect prediction with a subset of Kipoi models
Variant effect prediction allows to annotate a vcf file using model predictions for the reference and alternative alleles. The output is written to a new tsv file. For more information see https://github.com/kipoi/kipoi-veff2.
Documentation
Tutorials
- https://github.com/kipoi/examples - Use-case oriented tutorials
- notebooks
Citing Kipoi
If you use Kipoi for your research, please cite the publication of the model you are using (see model's cite_as entry) and the paper describing Kipoi: https://doi.org/10.1038/s41587-019-0140-0.
@article{kipoi,
  title={The Kipoi repository accelerates community exchange and reuse of predictive models for genomics},
  author={Avsec, Ziga and Kreuzhuber, Roman and Israeli, Johnny and Xu, Nancy and Cheng, Jun and Shrikumar, Avanti and Banerjee, Abhimanyu and Kim, Daniel S and Beier, Thorsten and Urban, Lara and others},
  journal={Nature biotechnology},
  pages={1},
  year={2019},
  publisher={Nature Publishing Group}
}
Development
If you want to help with the development of Kipoi, you are more than welcome to join in!
For the local setup for development, you should install all required dependencies using one of the provided dev-requirements(-py<36|37>).yml files
For systems using python 3.6/3.7:
conda env create -f dev-requirements-py36.yml --experimental-solver=libmamba
or
conda env create -f dev-requirements-py37.yml --experimental-solver=libmamba
conda activate kipoi-dev
pip install -e .
git lfs install
For systems using python >=3.8<=3.10:
conda create --name kipoi-dev python=3.8 (or 3.9, 3.10)
conda activate kipoi-dev
conda env update --name kipoi-dev --file dev-requirements.yml --experimental-solver=libmamba
pip install -e .
conda install -c bioconda cyvcf2 pybigwig
git lfs install
A note about cyvcf2 and pybigwig
For python >= 3.10, cyvcf2 and pybigwig are not available in conda yet. Install them from source like here and here instead. I will recommend against installing them using pip as it may lead to unexpected inconsistencies.
You can test the package by running py.test.
If you wish to run tests in parallel, run py.test -n 6.
License
Kipoi is MIT-style licensed, as found in the LICENSE file.