Generated from notebooks/contributing_models.ipynb
Contributing a model to the Kipoi model repository
This notebook will show you how to contribute a model to the Kipoi model repository. For a simple 'model contribution checklist' see also http://kipoi.org/docs/contributing/01_Getting_started.
Kipoi basics
Contributing a model to Kipoi means writing a sub-folder with all the required files to the Kipoi model repository via pull request.
Two main components of the model repository are model and dataloader.
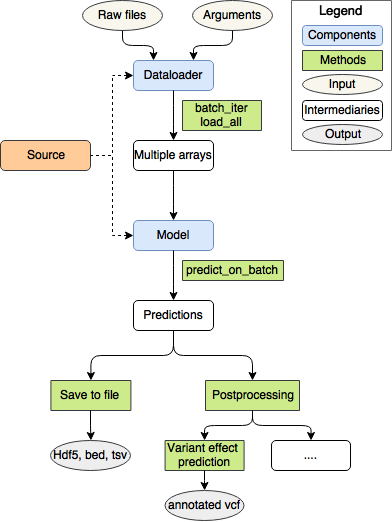
Model
Model takes as input numpy arrays and outputs numpy arrays. In practice, a model needs to implement the predict_on_batch(x) method, where x is dictionary/list of numpy arrays. The model contributor needs to provide one of the following:
- Serialized Keras model
- Serialized Sklearn model
- Custom model inheriting from
keras.model.BaseModel. - all the required files, i.e. weights need to be loaded in the
__init__
See http://kipoi.org/docs/contributing/02_Writing_model.yaml/ and http://kipoi.org/docs/contributing/05_Writing_model.py/ for more info.
Dataloader
Dataloader takes raw file paths or other parameters as argument and outputs modelling-ready numpy arrays.
Before writing your own dataloader take a look at our kipoiseq repository to see whether your use-case is covered by the available dataloaders.
Writing your own dataloader
Technically, dataloading can be done through a generator---batch-by-batch, sample-by-sample---or by just returning the whole dataset. The goal is to work really with raw files (say fasta, bed, vcf, etc in bioinformatics), as this allows to make model predictions on new datasets without going through the burden of running custom pre-processing scripts. The model contributor needs to implement one of the following:
- PreloadedDataset
- Dataset
- BatchDataset
- SampleIterator
- BatchIterator
- SampleGenerator
- BatchGenerator
See http://kipoi.org/docs/contributing/04_Writing_dataloader.py/ for more info.
Folder layout
Here is an example folder structure of a Kipoi model:
MyModel
├── dataloader.py     # implements the dataloader (only necessary if you wrote your own dataloader)
├── dataloader.yaml   # describes the dataloader (only necessary if you wrote your own dataloader)
└── model.yaml         # describes the model
The model.yaml and dataloader.yaml files a complete description about the model, the dataloader and the files they depend on.
Contributing a simple Iris-classifier
Details about the individual files will be revealed throught the tutorial below. A simple Keras model will be trained to predict the Iris plant class from the well-known Iris dataset.
Outline
- Train the model
- Generate the model directory
- Store all data files required for the model and the dataloader in a temporary folder
- Write
model.yaml - Write
dataloader.yaml - Write
dataloader.py - Test with the model with
$ kipoi test . - Publish data files on zenodo
- Update
model.yamlanddataloader.yamlto contain the links - Test again
- Commit, push and generate a pull request
1. Train the model
Load and pre-process the data
import pandas as pd
import os
from sklearn.preprocessing import LabelBinarizer, StandardScaler

from sklearn import datasets
iris = datasets.load_iris()
# view more info about the dataset
# print(iris["DESCR"])
# Data pre-processing
y_transformer = LabelBinarizer().fit(iris["target"])
x_transformer = StandardScaler().fit(iris["data"])
x = x_transformer.transform(iris["data"])
y = y_transformer.transform(iris["target"])
x[:3]
array([[-0.90068117,  1.03205722, -1.3412724 , -1.31297673],
       [-1.14301691, -0.1249576 , -1.3412724 , -1.31297673],
       [-1.38535265,  0.33784833, -1.39813811, -1.31297673]])
y[:3]
array([[1, 0, 0],
       [1, 0, 0],
       [1, 0, 0]])
Train an example model
Let's train a simple linear-regression model using Keras.
from keras.models import Model
import keras.layers as kl

inp = kl.Input(shape=(4, ), name="features")
out = kl.Dense(units=3)(inp)
model = Model(inp, out)
model.compile("adam", "categorical_crossentropy")

model.fit(x, y, verbose=0)
Using TensorFlow backend.


WARNING:tensorflow:From /nfs/research1/stegle/users/rkreuzhu/conda-envs/kipoi_interpret/lib/python3.6/site-packages/keras/backend/tensorflow_backend.py:2857: calling reduce_sum (from tensorflow.python.ops.math_ops) with keep_dims is deprecated and will be removed in a future version.
Instructions for updating:
keep_dims is deprecated, use keepdims instead
WARNING:tensorflow:From /nfs/research1/stegle/users/rkreuzhu/conda-envs/kipoi_interpret/lib/python3.6/site-packages/keras/backend/tensorflow_backend.py:1340: calling reduce_mean (from tensorflow.python.ops.math_ops) with keep_dims is deprecated and will be removed in a future version.
Instructions for updating:
keep_dims is deprecated, use keepdims instead


<keras.callbacks.History at 0x2ab58e8ba860>
2. Set the model directory up:
In reality, you would also need to
- Fork the kipoi/models repository
- Clone your repository fork, ignoring all the git-lfs files
$ git clone [email protected]:<your_username>/models.git
- Create a new folder
<mynewmodel>
3. Store the files in a temporary directory
All the data of the model will have to be published on zenodo or figshare before the pull request is performed. While setting the Kipoi model up, it is handy the keep the models in a temporary directory in the model folder, which we will delete prior to the pull request.
# create the model directory
!mkdir contribution_sample_model
# create the temporary directory where we will keep the files that should later be published in zenodo or figshare
!mkdir contribution_sample_model/tmp
Now we can change the current working directory to the model directory:
import os
os.chdir("contribution_sample_model")
3a. Static files for dataloader
Since in our case here we require to write a new dataloader. The dataloader can use some trained transformer instances (here the LabelBinarizer and StandardScaler transformers form sklearn). These should be uploaded with the model files and then referenced correctly in the dataloader.yaml file. We will store the required files in the temporary folder:
import pickle
with open("tmp/y_transformer.pkl", "wb") as f:
    pickle.dump(y_transformer, f, protocol=2)

with open("tmp/x_transformer.pkl", "wb") as f:
    pickle.dump(x_transformer, f, protocol=2)
! ls tmp
x_transformer.pkl y_transformer.pkl
3b. Model definition / weights
Now that we have the static files that are required by the dataloader, we also need to store the model architecture and weights:
# Architecture
with open("tmp/model.json", "w") as f:
    f.write(model.to_json())

# Weights
model.save_weights("tmp/weights.h5")
Alternatively if we would be using a scikit-learn model we would save the pickle file:
# Alternatively, for the scikit-learn model we would save the pickle file
from sklearn.linear_model import LogisticRegression
from sklearn.multiclass import OneVsRestClassifier
lr = OneVsRestClassifier(LogisticRegression())
lr.fit(x, y)

with open("tmp/sklearn_model.pkl", "wb") as f:
    pickle.dump(lr, f, protocol=2)
3c. Example files for the dataloader
Every Kipoi dataloader has to provide a set of example files so that Kipoi can perform its automated tests and users can have an idea what the dataloader files have to look like. Again we will store the files in the temporary folder:
# select first 20 rows of the iris dataset
X = pd.DataFrame(iris["data"][:20], columns=iris["feature_names"])
y = pd.DataFrame({"class": iris["target"][:20]})
# store the model input features and targets as csv files with column names:
X.to_csv("tmp/example_features.csv", index=False)
y.to_csv("tmp/example_targets.csv", index=False)
4 Write the model.yaml
Now it is time to write the model.yaml in the model directory. Since we are in the testing stage we will be using local file paths in the args field - those will be replaced by zenodo links once everything is ready for publication.
model_yaml = """
defined_as: kipoi.model.KerasModel  # use `kipoi.model.KerasModel`
args:  # arguments of `kipoi.model.KerasModel`
    arch: tmp/model.json
    weights: tmp/weights.h5
default_dataloader: . # path to the dataloader directory. Here it's defined in the same directory
info: # General information about the model
    authors:
        - name: Your Name
          github: your_github_username
          email: [email protected]
    doc: Model predicting the Iris species
    cite_as: https://doi.org:/... # preferably a doi url to the paper
    trained_on: Iris species dataset (http://archive.ics.uci.edu/ml/datasets/Iris) # short dataset description
    license: MIT # Software License - defaults to MIT
dependencies:
    conda: # install via conda
      - python=3.9
      - h5py=3.6
      - pip=21.2.4
      - keras=2.8
      - tensorflow=2.8
    pip:   # install via pip
      - protobuf==3.20
schema:  # Model schema
    inputs:
        features:
            shape: (4,)  # array shape of a single sample (omitting the batch dimension)
            doc: "Features in cm: sepal length, sepal width, petal length, petal width."
    targets:
        shape: (3,)
        doc: "One-hot encoded array of classes: setosa, versicolor, virginica."
"""
with open("model.yaml", "w") as ofh:
    ofh.write(model_yaml)
5 and 6 Write the dataloader.yaml and dataloader.py
PLEASE REMEMBER: Before writing a dataloader yourself please check whether the same functionality can be achieved using a ready-made dataloader in kipoiseq and use those as explained in the Kipoi docs.
Now it is time to write the dataloader.yaml. Since we defined the default_dataloader field in model.yaml as . Kipoi will expect that our dataloader.yaml file lies in the same directory. Since we are in the testing stage we will be using local file paths in the args field - those will be replaced by zenodo links once everything is ready for publication.
dataloader_yaml = """
type: Dataset
defined_as: dataloader.MyDataset
args:
    features_file:
        # descr: > allows multi-line fields
        doc: >
          Csv file of the Iris Plants Database from
          http://archive.ics.uci.edu/ml/datasets/Iris features.
        type: str
        example: tmp/example_features.csv  # example files
    x_transformer:
        default: tmp/x_transformer.pkl
        #default:
        #      url: https://github.com/kipoi/kipoi/raw/57734d716b8dedaffe460855e7cfe8f37ec2d48d/example/models/sklearn_iris/dataloader_files/x_transformer.pkl
        #      md5: bc1bf3c61c418b2d07506a7d0521a893
    y_transformer:
        default: tmp/y_transformer.pkl
    targets_file:
        doc: >
          Csv file of the Iris Plants Database targets.
          Not required for making the prediction.
        type: str
        example: tmp/example_targets.csv
        optional: True  # if not present, the `targets` field will not be present in the dataloader output

info:
    authors:
        - name: Your Name
          github: your_github_account
          email: [email protected]
    version: 0.1
    doc: Model predicting the Iris species
dependencies:
    conda:
      - python=3.9
      - pandas=1.4
      - numpy=1.22
    pip:
      - sklearn==0.0
output_schema:
    inputs:
        features:
            shape: (4,)
            doc: "Features in cm: sepal length, sepal width, petal length, petal width."
    targets:
        shape: (3, )
        doc: "One-hot encoded array of classes: setosa, versicolor, virginica."
    metadata:  # field providing additional information to the samples (not directly required by the model)
        example_row_number:
            doc: Just an example metadata column
"""
with open("dataloader.yaml", "w") as ofh:
    ofh.write(dataloader_yaml)
Since we have referred to the dataloader as dataloader.MyDataset we expect a dataloader.py file in the same directory as dataloader.yaml which has to contain the dataloader class, which is here MyDataset.
Notice that external static files are arguments to the __init__ function! Their path was defined in the dataloader.yaml.
import pickle
from kipoi.data import Dataset
import pandas as pd
import numpy as np

def read_pickle(f):
    with open(f, "rb") as f:
        return pickle.load(f)

class MyDataset(Dataset):

    def __init__(self, features_file, targets_file=None, x_transformer=None, y_transformer=None):
        self.features_file = features_file
        self.targets_file = targets_file

        self.y_transformer = read_pickle(y_transformer)
        self.x_transformer = read_pickle(x_transformer)

        self.features = pd.read_csv(features_file)
        if targets_file is not None:
            self.targets = pd.read_csv(targets_file)
            assert len(self.targets) == len(self.features)

    def __len__(self):
        return len(self.features)

    def __getitem__(self, idx):
        x_features = np.ravel(self.x_transformer.transform(self.features.iloc[idx].values[np.newaxis]))
        if self.targets_file is None:
            y_class = {}
        else:
            y_class = np.ravel(self.y_transformer.transform(self.targets.iloc[idx].values[np.newaxis]))
        return {
            "inputs": {
                "features": x_features
            },
            "targets": y_class,
            "metadata": {
                "example_row_number": idx
            }
        }
In order to elucidate what the Dataloader class does I will make a few function calls that are usually performed by the Kipoi API in order to generate model input:
# instantiate the dataloader
ds = MyDataset("tmp/example_features.csv", "tmp/example_targets.csv", "tmp/x_transformer.pkl",
               "tmp/y_transformer.pkl")
# call __getitem__
ds[5]
{'inputs': {'features': array([-0.53717756,  1.95766909, -1.17067529, -1.05003079])},
 'targets': array([1, 0, 0]),
 'metadata': {'example_row_number': 5}}
it = ds.batch_iter(batch_size=3, shuffle=False, num_workers=2)
next(it)
{'inputs': {'features': array([[-0.90068117,  1.03205722, -1.3412724 , -1.31297673],
         [-1.14301691, -0.1249576 , -1.3412724 , -1.31297673],
         [-1.38535265,  0.33784833, -1.39813811, -1.31297673]])},
 'targets': array([[1, 0, 0],
        [1, 0, 0],
        [1, 0, 0]]),
 'metadata': {'example_row_number': array([0, 1, 2])}}
I will now store the code from above in a file so that we can test it:
dataloader_py = """
import pickle
from kipoi.data import Dataset
import pandas as pd
import numpy as np

def read_pickle(f):
    with open(f, "rb") as f:
        return pickle.load(f)

class MyDataset(Dataset):

    def __init__(self, features_file, targets_file=None, x_transformer=None, y_transformer=None):
        self.features_file = features_file
        self.targets_file = targets_file

        self.y_transformer = read_pickle(y_transformer)
        self.x_transformer = read_pickle(x_transformer)

        self.features = pd.read_csv(features_file)
        if targets_file is not None:
            self.targets = pd.read_csv(targets_file)
            assert len(self.targets) == len(self.features)

    def __len__(self):
        return len(self.features)

    def __getitem__(self, idx):
        x_features = np.ravel(self.x_transformer.transform(self.features.iloc[idx].values[np.newaxis]))
        if self.targets_file is None:
            y_class = {}
        else:
            y_class = np.ravel(self.y_transformer.transform(self.targets.iloc[idx].values[np.newaxis]))
        return {
            "inputs": {
                "features": x_features
            },
            "targets": y_class,
            "metadata": {
                "example_row_number": idx
            }
        }
"""
with open("dataloader.py", "w") as ofh:
    ofh.write(dataloader_py)
7 Test the model
Now it is time to test the model.
!kipoi test .
[33mWARNING[0m [44m[kipoi.specs][0m doc empty for one of the dataloader `args` fields[0m
[33mWARNING[0m [44m[kipoi.specs][0m doc empty for one of the dataloader `args` fields[0m
[32mINFO[0m [44m[kipoi.data][0m successfully loaded the dataloader from /nfs/research1/stegle/users/rkreuzhu/opt/model-zoo/notebooks/contribution_sample_model/dataloader.MyDataset[0m
Using TensorFlow backend.
2018-10-11 17:41:58.586759: I tensorflow/core/platform/cpu_feature_guard.cc:140] Your CPU supports instructions that this TensorFlow binary was not compiled to use: AVX2 FMA
[32mINFO[0m [44m[kipoi.model][0m successfully loaded model architecture from <_io.TextIOWrapper name='tmp/model.json' mode='r' encoding='UTF-8'>[0m
[32mINFO[0m [44m[kipoi.model][0m successfully loaded model weights from tmp/weights.h5[0m
[32mINFO[0m [44m[kipoi.pipeline][0m dataloader.output_schema is compatible with model.schema[0m
[32mINFO[0m [44m[kipoi.pipeline][0m Initialized data generator. Running batches...[0m
[32mINFO[0m [44m[kipoi.pipeline][0m Returned data schema correct[0m
100%|█████████████████████████████████████████████| 1/1 [00:00<00:00, 28.88it/s]
[32mINFO[0m [44m[kipoi.pipeline][0m predict_example done![0m
[32mINFO[0m [44m[kipoi.cli.main][0m Successfully ran test_predict[0m
8. Publish data on zenodo or figshare
Now that the model works It is time to upload the data files onto zenodo or figshare. To do so follow the instructions on the website. It might be necessary to remove file suffixes in order to be able to load the respective files.
9 Update model.yaml and dataloader.yaml
Now the local file paths in model.yaml and dataloader.yaml have to be replaced by the zenodo / figshare URLs in the following way.
The entry:
args:
    ...
    x_transformer:
        default: tmp/x_transformer.pkl
would be replaced by:
args:
    ...
    x_transformer:
        default:
            url: https://zenodo.org/path/to/example_files/x_transformer.pkl
            md5: 76a5sd76asd57
So every local path has to be replaced by the url and md5 combination. Where md5 is the md5 sum of the file. If you cannot find the the md5 sum on the zenodo / figshare website you can for example run curl https://zenodo.org/.../x_transformer.pkl | md5sum to calculate the md5 sum.
Now after replacing all the files, test the setup again by running kipoi test . and then delete the tmp folder. Now the only file(s) remaining in the folder should be model.yaml (and in this case also: dataloader.py dataloader.yaml).
9 Test again
Now that you have deleted the temporary files, rerun the test to make sure everything works fine.
10 Commit and push
Now commit the model.yaml and if needed (like in this example) also the dataloader.py and datalaoder.yaml files by running: git add model.yaml.
Now you can push back to your fork (git push) and submit a pull request with kipoi/models to request adding your model to the Kipoi models.
Accessing local models through kipoi
In Kipoi it is not necessary to publish your model. You can leverage the full functionality of Kipoi also for local models. All you have to do is specify --source dir when using the CLI or setting source="dir" in the python API. The model name is then the local path to the model folder.
import kipoi
m = kipoi.get_model(".", source="dir") # See also python-sdk.ipynb
m.pipeline.predict({"features_file": "tmp/example_features.csv", "targets_file": "tmp/example_targets.csv" })[:5]
0it [00:00, ?it/s][A
1it [00:00, 19.03it/s][A
array([[ 3.2324865 , -0.29753828, 0.62135816],
[ 2.8549244 , 0.4957999 , 0.6873083 ],
[ 3.2744825 , 0.40906954, 0.99161 ],
[ 3.1413555 , 0.58123374, 1.0272367 ],
[ 3.416262 , -0.34901416, 0.76257455]], dtype=float32)
m.info
ModelInfo(authors=[Author(name='Your Name', github='your_github_username', email='[email protected]')], doc='Model predicting the Iris species', name=None, version='0.1', license='MIT', tags=[], contributors=[], cite_as='https://doi.org:/...', trained_on='Iris species dataset (http://archive.ics.uci.edu/ml/datasets/Iris)', training_procedure=None)
m.default_dataloader
dataloader.MyDataset
m.model
<keras.engine.training.Model at 0x2ab5a3eff668>
m.predict_on_batch
<bound method KerasModel.predict_on_batch of <kipoi.model.KerasModel object at 0x2ab5a2d75160>>
Best practices
- Like all other types of virtual environment, conda environments are sensitive to changes in the ever changing world of python dependencies. It is recommended that you pin the versions of the packages listed under dependencies to that used in your local setup. If you already have a conda environment, simply do the following -
conda env export --no-build > env.yml
cat env.yml | grep keras - Try installing keras, tensorflow, h5py, numpy, pandas etc. from conda as opposed to pip. These packages depend on system libraries so installing them from pip is likely to lead to unintended inconsistencies.
- If you are using a specific conda channel for a particular dependency, you can specify them as channel::package=version such as bioconda::pysam=0.16
- During nightly tests, a conda environment is created for each model group from scratch. If there is a test template present in
model.yamlgenerated predictions are compared against predictions stored in a file. In general, kipoi maintainers will generate a test file and updatemodel.yamlafter your submission. However, optionally you can do this as well. The steps are as follows -kipoi test <model-name> --source=dir -o <model-name>.predictions.h5- Upload
<model-name>.predictions.h5on zenodo or a file hosting service of choice and get an url and checksum - Add a snippet like this to
model.yaml. By default the desired precision is 7 decimal places. Feel free to adjust this.
- In some cases, you may submit a model group that contains multiple models with similar configuration. If you feel it is okay to just test a subset of them during kipoi repository's nightly tests - add a file in the top level called test_subset.txt and specify the name of the model like here. In this case, the above test snippet needs to be modified like so. However, this is optional.
- FYI: Your submitted models will be tested in our circleci infrastructure. The specifications are -
- OS: ubuntu-2004:current
- conda: latest version
Recap
Congrats! You made it through the tutorial! Feel free to use this model for your model template. Alternatively, you can use kipoi init to setup a model directory. Make sure you have read the getting started guide for contributing models.